

How Do I Determin How Many Drip Emeters Per Plant In A Vegetable Garden
- Drip Irrigation Design Guidelines
- The Basic Parts of a Drip System
- Drip Irrigation Emitters
- Drip Emitter Spacing (this page)
- Drip Irrigation Valves
- Irrigation Backflow Preventers
- How to Find the Size of a Pipe
- Drip Systems for Slopes and Hillsides
- Gravity Flow Drip Systems
- Drip System Sample Detail Drawings
Note: You will notice when I give the English unit equivalents of the metric they are not exact. This is because I am fudging the values to give you the values most commonly used in the industry. So while 1 meter is 39.37 inches, if I am using the distance in reference to emitter spacing, I may convert it to 36 inches to reflect the common spacing you will find when shopping for drip products in the USA.
Water, Soil, and Plants
You're out in the desert (on a horse with no name?) and you're really hot and thirsty. So you open your canteen and pour all the water over your head. It feels really great, but you're still thirsty. Why? Because you don't drink water through your hair follicles! As most people are aware, most plants "drink" through their roots. But not all of the roots are for drinking. The roots that most plants use for drinking (and eating too) are found in the top 15 cm (6 inches) of the soil. (I often see water conservation articles that say the roots in the top 45 cm uptake water, but in my practical experience most common garden plants seem to have great difficulty utilizing water deeper than 15 cm. Desert plants and chaparral plants are an exception, they do tap into water far below the soil surface.) The deeper roots are primarily for holding the plant in place. Watering these lower roots is a waste of water, just as pouring water over a thirsty man's head is a waste of water!
Now lets take that same thirsty man and give him a large cup of water. But we'll force him to drink it through one of those tiny plastic straws used to stir coffee. That doesn't help much either, does it? The point is that, like the man, the plant can only drink water if it is applied in the proper place, in the proper amount. The plant can only take up a limited amount of water through a single root, so we have to get the water to as many "feeder roots" (the roots the plant uses to obtain water and nutrients) as possible or the plant won't be able to get enough water. How do we do this? Stupid question?
As a general rule, the feeder roots of most common garden plants are primarily located in the top 15 cm (6 inches) of soil throughout the area called the drip zone. The "drip zone" is the area of soil located directly under the leaves of the plant. If you draw a circle around the plant on the ground at the outer edge of the plant's leaves, the area within that circle is the drip zone. (The line at the edge of the leaves is called the "drip line".) So we need to concentrate on watering that area under the leaves in order to make the most efficient use of our water. That also makes for a healthy plant. Again, desert plants and those adapted to very dry climates have wider ranging feeder roots that allow them to adapt to a limited water supply. These plants typically only need supplemental irrigation water (often only for the first few years to get them established), so it is still OK if we only concern ourselves with irrigating the drip zone for them as well.
When we drip water onto the ground at the optimum slow rate the water will almost immediately soak into the soil. Once in the soil the water moves both downward and sideways through the soil. The water moves between the grains of soil by a combination of water pressure, gravity, and capillary action. How fast and far the water moves horizontally (sideways) from the point it is applied depends on the texture of the soil. In fine textured soils, such as clay, the water will move the farthest, but it also moves at the slowest speed. In a very "heavy" clay soil it might take days for the moisture to move the length of your arm. In "light" coarse-textured soils like sand or silt it will not move nearly as far, but it will move much faster! It might move the length of your arm in a few minutes in a silty soil.
Emitter Quantity and Spacing
The number of drip emitters needed and the distance between them is determined by the size of the drip zone and the type of soil.
Size of drip zone: If the plant has a large drip zone, like a tree, you will need more emitters than you would for a small shrub. Obviously the size of the drip zone will be smaller when the plant is young and will increase in size as the plant grows. So you need to plan for enough emitters to water the drip zone of the plant when it is mature. You can start out with just one or two emitters when the plant is a seedling, and add more emitters as the plant grows. Just be sure to plan enough water capacity in the system to supply those future emitters. So how do you figure out what size the drip zone of the mature plant will be? Just type the name of almost any plant into an Internet search engine and you will find a number of websites that will tell you what the expected diameter of that species will be when mature.
Soil type: In sandy soil your emitters will need to be closer together because the water does not move as far horizontally in a sandy soil. In a clay soil, where the water moves farther sideways, the emitters may be farther apart. Unfortunately determining what type of soil you have, and translating that into a spacing for your emitters, is difficult for the average person. Most people can't really tell if a soil is silt or clay simply by looking at it. Even after numerous college courses in soil science and many years of experience I still get fooled now and then by a soil that doesn't test out as I think it will. Embarrassingly, my own yard is an example of one I mis-guessed on! There are a couple of quick visual tests. One is that clay soil often cracks and splits when it dries. Another test is to take a handful of wet soil and ball it up in your hand, if it will not hold together well in a ball it is sandy or silty. Clay soil feels like… well, surely you've made something out of modeling clay at some point in your life and know what it feels like! It's sticky and pliable. But the best method to find out our emitter spacing is to actually test the water movement in the soil. So the link below will provide you with instructions for a simple method of testing water movement. It involves consuming 2 liters of your favorite drink, so it can't be too bad!
Why not just use an emitter with a higher flow rate for larger plants? This is a common misconception. The reason using a higher flow rate emitter doesn't work is that the higher flow emitter does not wet more feeder root area. The additional water just goes down deeper into the soil or runs off on the surface, and the extra water is useless to the plant and wasted. So a larger emitter is of no help at all to a larger plant as it does not wet any more of the feeder root soil area. Going back to our thirsty man illustration, a larger emitter would be like pouring a large pitcher of water in our thirsty man's mouth all at once. He could manage to swallow a cup or so of the water, but the rest would just spill out onto the floor. So all the emitters on your drip system should have the same flow rate. The exception: Yep, there often is one! The exception is when watering potted plants. Each potted plant may have a different size pot, a different type of soil in it, a different type of plant, and each pot may have a different sun exposure that causes the soil in the pot to dry faster. For these reasons there will be major changes in water needs between pots. When watering pots I like to use the emitters that have an adjustable flow. That way I can adjust the emitter in each pot to get the right flow rate for that specific pot.
Test to Determine Horizontal Water Movement
To figure out how far horizontally the water will move in your soil you can perform a simple test which I have described on a separate page. Simple test for determining the horizontal water movement in soil.
Calculating Emitter Spacing
Once you know how far the water will soak horizontally in the soil you can determine an optimal emitter spacing. Just multiple the distance the water moved by 1.9 to get the spacing distance. Using 1.9 rather than 2 allows a slight overlap of the wet areas. So if you find the water moves 525mm in the soil you would multiply 525 x 1.9 to give a optimal spacing of 1000mm or 1 meter (36 inches).
If you didn't test the actual soil you can estimate the spacing based on the soil type.
Typical spacing of 4 lph (1 gph) emitters:
- Coarse soil (sand): 60cm (24 inches)
- Medium soil: 1.0m (36 inches)
- Fine soil (clay): 1.3m (48 inches)
Typical spacing of 2 lph (0.5 gph) emitters:
- Coarse soil (sand): 30cm (12 inches)
- Medium soil: 60cm (24 inches)
- Fine soil (clay): 1.0m (36 inches)
Watering Large Landscape Trees
It is pretty obvious that due to the huge diameter of a large shade tree it would take a lot of emitters to fully water the area within the tree's drip zone. Fortunately some things help you out here. The first is that most large trees have aggressive root systems that are able to seek out water from deeper below ground and beyond the drip zone. This means that for a mature tree you can often put emitters a bit farther apart and you can even leave a few small areas of the drip zone dry. (There are always exceptions to the rules. Water loving trees like willows and cypress are going to want all the emitters and water you are willing to give them. Hopefully these water-loving trees are planted near a natural water source that they can grow roots into, like a creek or pond.) Another factor in tree irrigation is that most landscape trees are not planted alone. Typically a tree will have a lawn under part of it's canopy, or perhaps a combination of ground cover and shrubs. Remember we are discussing large, established trees. If you are planting a new container or bareroot tree you will want to place at least two emitters per tree, one on each side of the rootball. Most newly planted trees need lots of water to get established and grow.
My design approach to drip irrigation for trees is to start by selecting the emitter locations for shrubs and groundcover as if there were not any trees. Then I add an emitter (or two) next to the rootball of each NEW tree to be planted, as well as any young existing trees. Finally, I look at both existing and future tree locations to see if there are any large unirrigated areas left under the tree canopy. Then I add emitters for those dry areas if I think they are needed. (You can look up the tree on-line to see what the water requirements are.) If I don't think more emitters will be needed I still leave a little extra capacity in the design so I can add them later. That's an advantage of drip irrigation; it is relatively easy to come back and add more emitters if it seems like the tree is in need of more water.
Native trees: Some established mature trees should not be irrigated. This is particularly true of some native species, especially oak trees. Regular irrigation of these trees can cause diseases that will damage or kill the tree. As a general rule if a tree is surviving well without any irrigation, it is best to not put any irrigation within the drip zone of that tree. If you are planting a new tree you may install irrigation under it in most cases. It is only mature, established trees, that have been living without irrigation for years, that have a problem with irrigation. Like a lot of older people, many old trees don't like change! If you need to plant something under an existing native tree, most experts suggest that you plant shrubs or groundcover that can survive without any regular irrigation. Some careful hand-watering of the new plants to get them established after planting is usually OK, just keep it as minimal as possible.
Hedges, Hedge-Rows and Wind Breaks
Hedges, hedge-rows and wind breaks consist of plants placed tightly together in a row for various purposes. They are typically watered using dripperline or regular drip tube with evenly spaced emitters, similar to the description for agricultural drip systems below. Read the section below on Agricultural Drip Systems for more details. Avoid using the disposable laser-tube and drip-tape products unless you plan for the irrigation to be temporary.
Agricultural Drip Systems
In an agricultural situation most of the same rules for spacing emitters apply. The primary difference is that plants in an agricultural setting tend to be planted in rows. This means the emitters are most often placed in rows as well, and most often dripperline (also called dripline) is used. Dripperline is drip tubing with built-in emitters evenly spaced along the tubing. The advantages of dripperline are: it is easier and faster to install, the emitters are typically molded on the inside of the tube so they are less likely to be broken by field workers, and finally it is easier to move the tubes to allow the soil to be tilled, or to allow harvesting of the crop.
When watered with dripperline the roots of larger crops, such as vineyards and trees, will tend to grow in a row, following the wet soil along the length of the dripperline. This is not a problem, as in agriculture the plants are often pruned or trained into hedge-rows. So both the foliage and the irrigated roots are growing in a row.
Row Crops: For row crops emitters spaced at 30cm (12 inches) along the tube are most often used. Typically large spreading row crops (such as cucumbers and melons) use a single tube per row of plants. Most smaller row crops (strawberries, broccoli, etc.) use a wide berm with one tube down the center between two rows of plants. With row crops a lower cost disposable laser-tube or drip-tape is often used, this disposable tube/tape is intended to only last for one or two growing seasons. The disposable tube/tape is buried 75-150mm (3 to 6 inches) below ground and then is pulled up after harvest and is (hopefully) sent to a recycler. A careful gardener may get several seasons of use out of these tapes before they fill with roots and plug up. (Make sure you run the water at least weekly to help keep out roots.) For most home gardens I recommend using standard poly dripperlines, with built-in emitters spaced 30cm (12 inches) apart. This heavier poly tubing will last several years. Because the emitters are built into the tube, the tubing can be easily rolled up and stored between seasons. If you try to roll up tube with the punch-in emitters installed on it my experience is that a lot of the emitters will get broken off. I think you will find the heavier poly dripperline tube is also much more durable than the "drip tapes" which is helpful in home gardens where it is more likely to get stepped on and nicked by shovels and weeding tools.
Vineyards and Orchards: For vineyards a single dripperline is often hung above ground on the lowest vine wire. With tree crops typically two dripperlines are used, one running on each side of the row of trees, with the tubes about 1m to 1.5m apart (3-5 feet.) For larger trees like walnuts 3 or 4 rows of tubes may be used. Agricultural dripperline for vines and trees typically have emitters spaced 60cm (24 inches) apart on the tube. Remember that there is often a trade-off between water application and crop production. While using only 2 rows of tubes for trees, rather than 3-4 rows, may save money and produce a nice-looking tree, it might also cause a significant drop in crop production.
Vegetable Gardens:
Read the Agricultural Drip Systems section above as gardens are similar. For vegetable gardens I recommend using a good dripperline with emitters spaced at 30cm (12 inches) and not buried. Connect them together using garden thread style hose couplers, or with garden hose quick connect couplers so they can be easily disassembled and removed. Use stakes to hold the dripperline in place. Top quality dripperline will last for many years and is less likely to be accidentally damaged than the disposable tapes/tubes.
Potted Plants:
Often home landscapes will have potted plants. Potted plants are where I break a lot of the rules I've previously given you. As noted above in the Emitter Quantity & Spacing section I like to use adjustable flow emitters for plants in pots. I also use the small diameter distribution or "spaghetti" tubing from my larger drip tube up to the emitter in the pot. The small tubing is much less ugly. I try to hide it as much as possible. A metal stake is used to hold the emitter in the pot. Do not try to put more than 2 emitters on a single length of the small distribution tubing. The small tube size restricts the flow and 2 emitters is about the maximum you can use. So a typical drip system for pots would consist of a 16mm (1/2″) tube running along the ground between the pots, a 6mm (1/4″) distribution tube from the larger tube up into the pot, and an adjustable flow emitter staked in the pot.
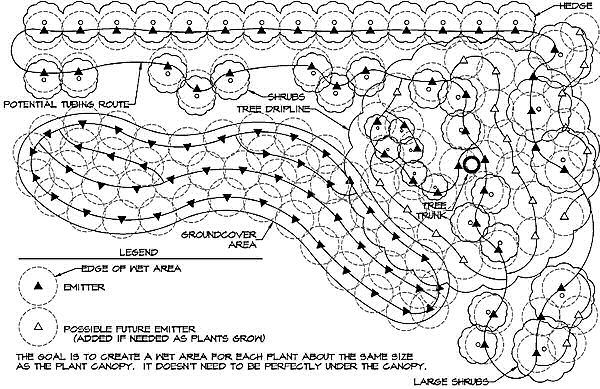
Click on the image above for a better quality pdf version of this Drip Emitter Spacing Detail.
How Do I Determin How Many Drip Emeters Per Plant In A Vegetable Garden
Source: https://www.irrigationtutorials.com/drip-emitter-spacing/
Posted by: collinsfecousels.blogspot.com
0 Response to "How Do I Determin How Many Drip Emeters Per Plant In A Vegetable Garden"
Post a Comment